Showing posts with label obiee. Show all posts

Friday, 12 August 2016

OBIEE Agents

Agents automates the process of delivering reports and dashboards
Configure Email settings:
  1. Login to Fusion Middleware Control Enterprise manager (http://yourservername:7001:/em) using Admin user credentials
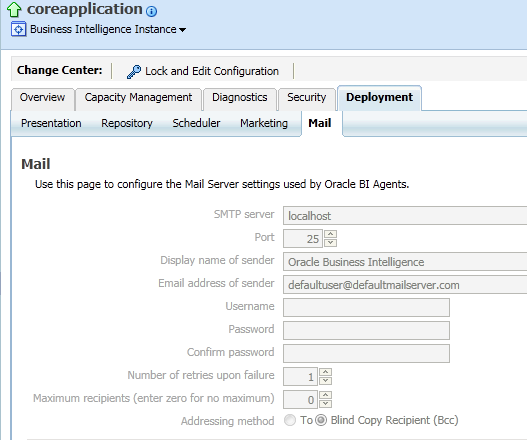
  2. Navigate to Mail tab (Business Intelligence > coreapplication > Deployment>Mail

    https://blogger.googleusercontent.com/img/b/R29vZ2xl/AVvXsEi2dB6Fd2lbK98Nh6OMjDB8XJ6U39Zm0bI4ebLCVInMDW2fXtBeLr8lin-Yj0f3MPXocZTZTFJGB08LpxhzKZUxHxPTyfugkJ5OX9bFMbKEArtdeKD1MFNTTCm6gyGnIJEfKO_I-3qroFIY/s1600/123.png
  3. Click Lock and Edit Configuration to enable changes to be made.
  4. Complete the elements with the following information.


• SMTP Server – SMTP server of your email
• Port – Port of the SMTP server (e.g. 25)
• Display name of sender – Any name(e.g.Oracle Business Intelligence)
• Email address of sender – Sender’s email address
• Username – Same as the sender’s email
• Password – password of your email
• Confirm password – confirm the same password as above
• Number of retries upon failure – any number
• Maximum recipients
• Addressing method To, Blind Copy Recipient (Bcc) – if you want to receive a BCC, select it.
  1. ctivate Changes.
  2. Return to the Business Intelligence Overview page and click Restart.

OBIEE Cache Management


Cache Management
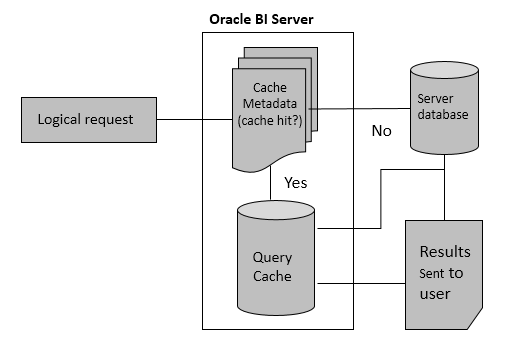
Overview: Oracle BI Server to maintain a local, disk-based cache of query result sets (query cache). The query cache enables the Oracle BI Server to satisfy many subsequent query requests without accessing back-end data sources, thereby increasing query performance.
Advantages
  1. Performance Improvement
  2. Less network traffic
Limitations
  1. Chance to get stale data
  2. Hard disk memory
  3. Cache maintenance
Architecture


Enabling Cache
  1. Log in to Fusion Middleware Control
  1. From the target navigation pane, open Business Intelligence and select coreapplication.
  2. Select Capacity management again Performance


OBIEE Security -Part 3 - Data Level Security

Data Level Security:
Data Level security controls rights to view data. Row level security is implemented by the BI server on the background automatically allowing users to see data or rows to which they are authorized to.
You can choose to set up row-level security in the repository, or in the database. Implementing row-level security in the repository provides many benefits, including the following:
  • All users share the same database connection pool for better performance
  • All users share cache for better performance
  • You can define and maintain security rules that apply across many federated data sources
Setting up Data Level Security:
  1. A aususer created and assigned BICONSUMER group
  1. Create a User_country table
CREATE TABLE USER_COUNTRY
  ( USERNAME VARCHAR2(20),
COUNTRY VARCHAR2(25)
  )
  1. Insert sample data
insert into user_country(username, country ) values ('WEBLOGIC', 'USA');
insert into user_country(username, country ) values ('USER1', 'IND');
insert into user_country(username, country ) values ('SAMPLEUSER', 'AUS');
insert into user_country(username, country ) values ('AUSUSER', 'AUS');

OBIEE Security -Part 2 - Object Level Security

Object Level Security:
Object level security deal with access restriction to various obiee objects for different application roles and users. Object level security is achieved by granting or denying access to application roles or user.
We can restrict access to following objects using object level security:
  • Repository Objects
    • Presentation Tables
    • Presentation table columns
    • Subject area
  • Webcatalog objects
    • Reports
    • Dashboards
    • Dashboard Pages
    • Catalog Folders
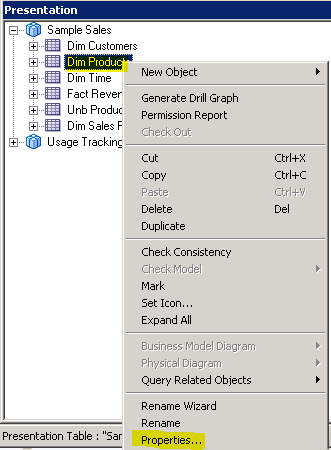
Repository Level: you can set object level security at repository on presentation layer.you can grant/deny access to user/application roles to access subject area, table or column
In presentation layer go to properties of a subject area, Table or Column.
Select permissions.
Select ‘Show all users/application roles’
Here you can see all the users and application roles and properties such as read, read/write, no access and default.

OBIEE Security - Part 1

Overview of Security in Oracle Business Intelligence:
Oracle Business Intelligence 11g is tightly integrated with the Oracle Fusion Middleware Security architecture and delegates core security functionality to components of that architecture. Specifically, any Oracle Business Intelligence installation makes use of the following types of security providers:
Authentication provider that knows how to access information about the users and groups accessible to Oracle Business Intelligence and is responsible for authenticating users.
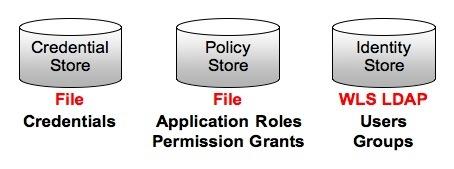
Policy store provider that provides access to Application Roles and Application Policies, which forms a core part of the security policy and determines what users can and cannot see and do in Oracle Business Intelligence.
Credential store provider that is responsible for storing and providing access to credentials required by Oracle Business Intelligence.
security_1.jpg
By default, an Oracle Business Intelligence installation is configured with an authentication provider that uses the Oracle WebLogic Server embedded LDAP server for user and group information. The Oracle Business Intelligence default policy store provider and credential store provider store Credentials, Application Roles and Application Policies in files in the domain.
Authentication: Each Oracle Business Intelligence 11g installation has an associated Oracle WebLogic Server domain. Oracle Business Intelligence delegates user authentication to the first authentication provider configured for that domain.
  • The default authentication provider accesses user and group information stored in the LDAP server embedded in the Oracle Business Intelligence's Oracle WebLogic Server domain.
  • The Oracle WebLogic Server Administration Console can be used to create and manage users and groups in the embedded LDAP server.
Authorization: After a user has been authenticated, the next critical aspect of security is ensuring that the user can do and see what they are authorized to do and see. Authorization is controlled by a security policy defined in terms of applications roles.
Application Roles represent a functional role that a User has, which gives that User the privileges required to perform that role. For example, having the Sales Analyst Application Role might grant a User access to view, edit and create reports on a company's sales pipeline.

NewImage

OBIEE 11g Usage Tracking

Checking for Usage Tracking Table
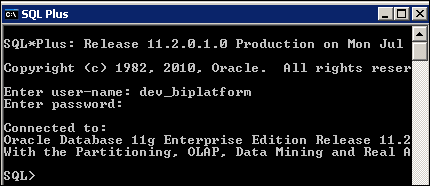
In this sub-section, you check for the existence of the S_NA_ACCT Usage Tracking table in the database Repository Creation Utility (RCU) schema. In this example, the data source name is orcl, the schema name isdev_biplatform, and the password is Oracle01. Open SQL*Plus on your desktop. Log in with the user name dev_biplatform and password Oracle01.
http://www.oracle.com/webfolder/technetwork/tutorials/obe/fmw/bi/bi1116/ut/images/t10101.gif
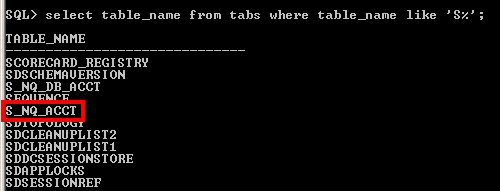
At the SQL prompt, enter the following SQL statement:
SQL>Select table_name from tabs where table_name like 'S%';
http://www.oracle.com/webfolder/technetwork/tutorials/obe/fmw/bi/bi1116/ut/images/t10102.gif
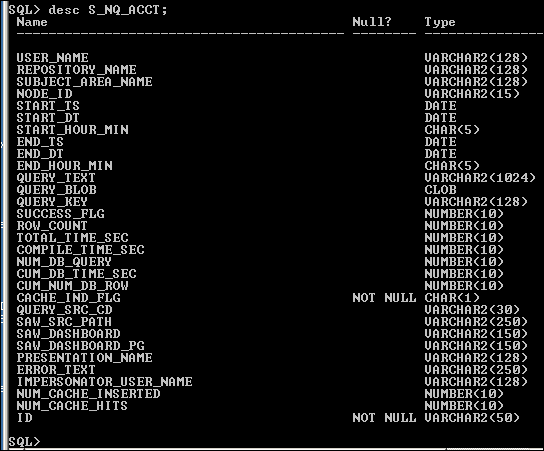
Check the columns names by entering the following statement:
SQL>Desc S_NQ_ACCT;
http://www.oracle.com/webfolder/technetwork/tutorials/obe/fmw/bi/bi1116/ut/images/t10103.gif
You can also use SQL Developer to check for the S_NQ_ACCT table.

Direct Database Request

You can create and issue a direct database request directly to a physical back-end database.
Setting Privileges for Direct Requests:
  1. Login to the Analytics Editor
  2. Select Manage Privileges from the Administration page.
  1. In Answers, Edit the properties for Edit Direct Database Analysis, Execute Direct Database Analaysis
  1. In RPD, open identity manager from Manage
  2. Select the user and click on permission
  1. Select the Query limits tab
  1. Set the Execute Direct database request property to Allow
  1. Click OK and save the Rpd.
Executing a Direct Database Request
  1. Login to analytics editor
  2. Select new analysis and select Create Direct Database Request
  1. Give the connectionpool name and write the sql query and click on validate SQL retrieve columns
  1. Click on the results tab to view the results

Sunday, 17 July 2016

Error [Security:090302]Authentication Failed: User BISystemUser denied

While Starting the weblogic server I am getting below error:
Caused by: oracle.security.jps.internal.jaas.module.AuthenticationException: [Security:090304]Authentication Failed: User BISystemUser javax.security.auth.login.FailedLoginException: [Security:090302]Authentication Failed: User BISystemUser denied at oracle.security.jps.wls.jaas.module.authentication.WlsUserAuthenticator.authenticate(WlsUserAuthenticator.java:61) Caused by: javax.security.auth.login.FailedLoginException: [Security:090304]Authentication Failed: User BISystemUser javax.security.auth.login.FailedLoginException: [Security:090302]Authentication Failed: User BISystemUser denied
Sol:
  1. Create BISystemUser in weblogic console->Security Realms->myrealm and assign Administrator and Oracle System Groups.
  1. Update  the password of BISystemUser in EM Console, BIFoundationDomain, Security, Credentials

  1. Restart the BI Services

OBIEE Presentation services URL is not working

when ever i try to start the BI services. I am getting the error following error:
Error 500--Internal Server Error
From RFC 2068 Hypertext Transfer Protocol -- HTTP/1.1:
10.5.1 500 Internal Server Error
The server encountered an unexpected condition which prevented it from fulfilling the request.
I checked every service up and running. While seeing the log file I identified the url with different ip.
Solution:  
Update the FMW_SERVICE_URL to your system ip(make it as static IP)

Wednesday, 13 July 2016

Trouble shoot: while starting bi server- error ORA-28001:The password has expired

While starting OBIEE Server getting below error because of schema password expiry.
C:\Users\vinodp\Desktop\Capture.JPG
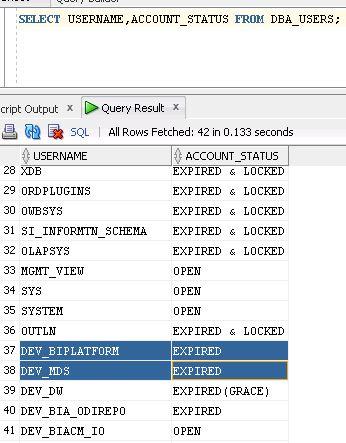
Trouble Shoot: check the schema status
C:\Users\vinodp\Desktop\Capture1.JPG
Solution:
1. Connect as sysdba to the database.
C:\Users\Siry>sqlplus / as sysdba
2. Set the password’s life time to unlimited.
SQL> ALTER PROFILE DEFAULT LIMIT PASSWORD_LIFE_TIME UNLIMITED;
4. Set the password for user.
SQL> ALTER USER user_name IDENTIFIED BY password;
6. Unlock the user account.
SQL> ALTER USER user_name ACCOUNT UNLOCK;
8. Make sure your user is not locked by executing below query.
SQL> SELECT USERNAME, ACCOUNT_STATUS FROM DBA_USERS;