Friday 18 December 2015

Set Yesterday or Some Date Value as default in OBIEE Dashboard Prompt

Aim is to set default value to yesterday or some other day that you desired in dashboard prompt. So, when we click on the dashboard page.

This can be done in many ways
Here I am going to introduce 3 ways of doing the same.
  1. Using Advanced SQL in Prompt (From Answer side)
  2. Using repository variable (From rpd side)
  3. Using derived column in rpd (Same using repository variable)
We discuss this one by one

Using Advanced SQL in Prompt (From Answer side):

  1. Create a prompt on date column as per your requirement
  2. In Default to option drop-down, select SQL Result SQL Result
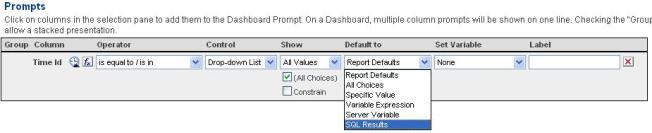
3.   Now click on eclipse button provided under selected SQL Result option
4.   Write the following query in the editor & click on OK.
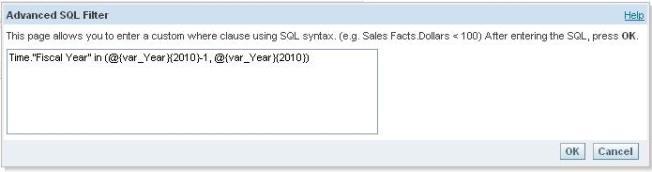
(Here I am explaining to set default value to yesterday,)
 SELECT CASE WHEN 1=0 THEN Times.”Time Id” else TIMESTAMPADD(SQL_TSI_DAY, -1, CURRENT_DATE) END FROM SH
In general, query will be,
SELECT CASE WHEN 1=0 THEN “any date column”  else TIMESTAMPADD(SQL_TSI_DAY, -1, CURRENT_DATE) END FROM “SubjectAreaName”
Write SQL
5.   Now add this prompt to dashboard page and you will be able to see the prompt is filled with the default value for yesterday
Note: If you want to set some other date as default, you can do that by simply changing the else part of SQL written.

Using repository variable (From rpd side):


1.   Open rpd and go to Manage > Variables… and select new initialization block to creating dynamic repository variable. Select new initialization block option.
2.   Click on Edit Data Source… and write the query & choose the corresponding connection pool as shown below.
Query is:
SELECT CURRENT_DATE – 1 FROM DUAL
(or)
SELECT SYSDATE – 1 FROM DUAL
QueryForVariable
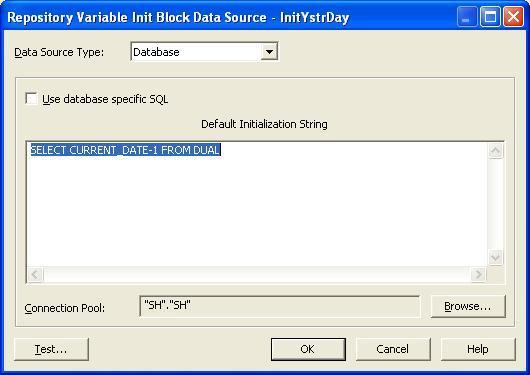
3.   Click on OK to confirm the query (You can test here the query o/p by clicking on Test button)
4.   Click on Edit Data Target… option and click New… to create new repository variable
5.   Give repository variable Name, here I am using YstrDay as Variable Name and click OK
Repository Variable
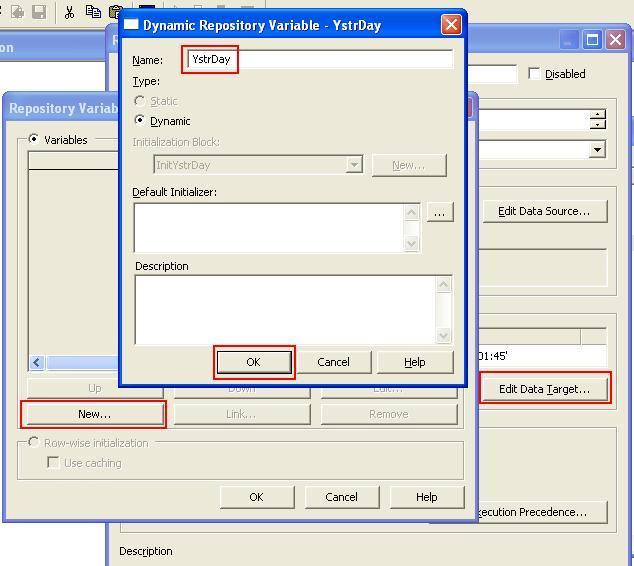
6.   Click OK and again OK to confirm creation of initialization block.
7.   Save the rpd and go to answers and reload the server metadata.
8.   Go to the prompt you have created already, and this time select Server Variable from Default to option.
Server Variable

9.   Click on Eclipse button under the Server Variable option and mention the repository variable name in editor. i.e. “YstrDay” in my case.

Conversion of date datatype to timestamp in OBIEE

In OBIEE, direct date to timestamp conversion is not possible unless we use evaluate functions to call l it’s database functions…

One way i found to convert date column to it’s timestamp is:
First, cast the date column to char later cast it to timestamp
Ex: Cast(Cast(CURRENT_DATE AS CHAR) AS TIMESTAMP)
  
You may have question why we need to convert it to timestamp.
Well, while using timestampdiff with sql_tsi_hour as interval, we can’t pass date datatype columns as it throws error:
Ex: TimestamDiff(SQL_TSI_HOUR, TimeID, CURRENT_DATE) won’t take as functionality. Gives you following error:

[nQSError: 10058] A general error has occurred. [nQSError: 22025] Function TimestampDiff is called with an incompatible type. (HY000)
 Now, try in this way:
TimestamDiff(SQL_TSI_HOUR, TimeID, Cast(Cast(CURRENT_DATE as Char) as Timestamp))
It gives you proper results without any error.

Year Ago Calculation without Time Series Functions

This article explains you how to calculate year ago measures without using time-series function.
Usually, for requirement like: measure, year ago measure want to show. We’ll go for 2 measures. One is: Measure and YearAgoMeasure calculated through time-series.
This blog entry also avoid to create other column for calculating year ago measure..
Here is the procedure:
I’m assuming you have Year dashboard Prompt, assigned with presentation variable:  var_Year
1. Create a filter on year column in this way:
https://bischool.files.wordpress.com/2010/10/filter.jpg?w=652
2. And filter should be like this:
https://bischool.files.wordpress.com/2010/10/advanced-filter.jpg?w=652
3.  Go to Pivot then arrange columns in this fashion and view Results:
You’ll be noticed that results are giving current/ (selected year from prompt) and previous year values.
Note: Apply descending order on Year column.
You may not like the labels showing year values. Instead of that, you may need to see the labels like: Current and Prior..
This can be done by writing following condition in Year Ex :
CASE WHEN Time.”Fiscal Year” = @{var_Year} then ‘Current’ when Time.”Fiscal Year” = @{var_Year}-1 then ‘Prior’ END
Limitation with this approach is: we’re using Advanced filter, which will not appear dynamically changing years in filters view (if you add filter view to compound layout)

Tuesday 15 December 2015

What is Surrogate key


Surrogate key is a substitution for the natural primary key.
It is just a unique identifier or number for each row that can be used for the primary key to the
table. The only requirement for a surrogate primary key is that it is unique for each row in the table.
Data warehouses typically use a surrogate, (also known as artificial or identity key), key for the
dimension tables primary keys. They can use Infa sequence generator, or Oracle sequence, or SQLServer Identity values for the surrogate key.

It is useful because the natural primary key (i.e. Customer Number in Customer table) can change and this makes updates more difficult.

Some tables have columns such as AIRPORT_NAME or CITY_NAME which are stated as the
primary keys (according to the business users) but ,not only can these change, indexing on a
numerical value is probably better and you could consider creating a surrogate key called, say,
AIRPORT_ID. This would be internal to the system and as far as the client is concerned you may display only the AIRPORT_NAME.

Another benefit you can get from surrogate keys (SID) is :
Tracking the SCD Slowly Changing Dimension.

Example:
On the 1st of January 2002, Employee 'E1' belongs to Business Unit 'BU1' (that's what would be in your Employee Dimension). This employee has a turnover allocated to him on the Business Unit 'BU1' But on the 2nd of June the Employee 'E1' is muted from Business Unit 'BU1' to Business Unit 'BU2.' All the new turnover have to belong to the new Business Unit 'BU2' but the old one should Belong to the Business Unit 'BU1.'

If you used the natural business key 'E1' for your employee within your datawarehouse everything would be allocated to Business Unit 'BU2' even what actually belongs to 'BU1.'

If you use surrogate keys, you could create on the 2nd of June a new record for the Employee 'E1' in your Employee Dimension with a new surrogate key.

This way, in your fact table, you have your old data (before 2nd of June) with the SID of the
Employee 'E1' + 'BU1.' All new data (after 2nd of June) would take the SID of the employee 'E1'+'BU2.'

You could consider Slowly Changing Dimension as an enlargement of your natural key: natural key of the Employee was Employee Code 'E1' but for you it becomes

Employee Code + Business Unit '-E1' + 'BU1' or 'E1' + 'BU2.' But the difference with the natural key enlargement process, is that you might not have all part of your new key within your fact table, so you might not be able to do the join on the new enlarge key -> so you need another id.

Implicit Fact Column

An Implicit fact column is used when we have multiple fact tables and the report is getting generated using only dimension columns.
A User may request a report where it may have only Dimensions and no Fact columns. In this case, the server may sometimes get confused as to which fact table should it join to fetch the data. So it joins to the nearest fact table and pulls the data through it. So the report output obtained may be different from what the user is expecting.So, in order to avoid this kind of error, we need to set Implicit Fact Column.

The goal of this is to guide the BI Server to make the best choice between two possible query paths.
We can set a fact attribute (measure) as an implicit fact column.
We can also create dummy implicit fact column on and assign any numeric value to it.

We can set implicit fact column in presentation catalog properties.

1.  Goto properties of presentation catalog in presentation layer.
2.  In implicit fact column section click on set and select any measure column from fact table.
3.  Click OK.
4.  Save your work.

Instead of selecting any fact measure column as implicit fact column, we can also define a dummy implicit fact.
1.  Create a Physical Column in Fact table in Physical Layer.
2.  Name it as Implicit_Column.
3.  Drag this column in Fact table from BMM layer.
4.  Double click on logical table source of fact table.
5.  In content tab, assign any numeric value to Implicit_Column.

Once this is done we can set this column as Implicit Fact Column in Presentation catalog as mentioned above.